RecyclewViewってよく使うのですが、ボイラープレート多いなーって思うことがあります。 Epoxyを使ってみたら最高だったので紹介します。
ゴール
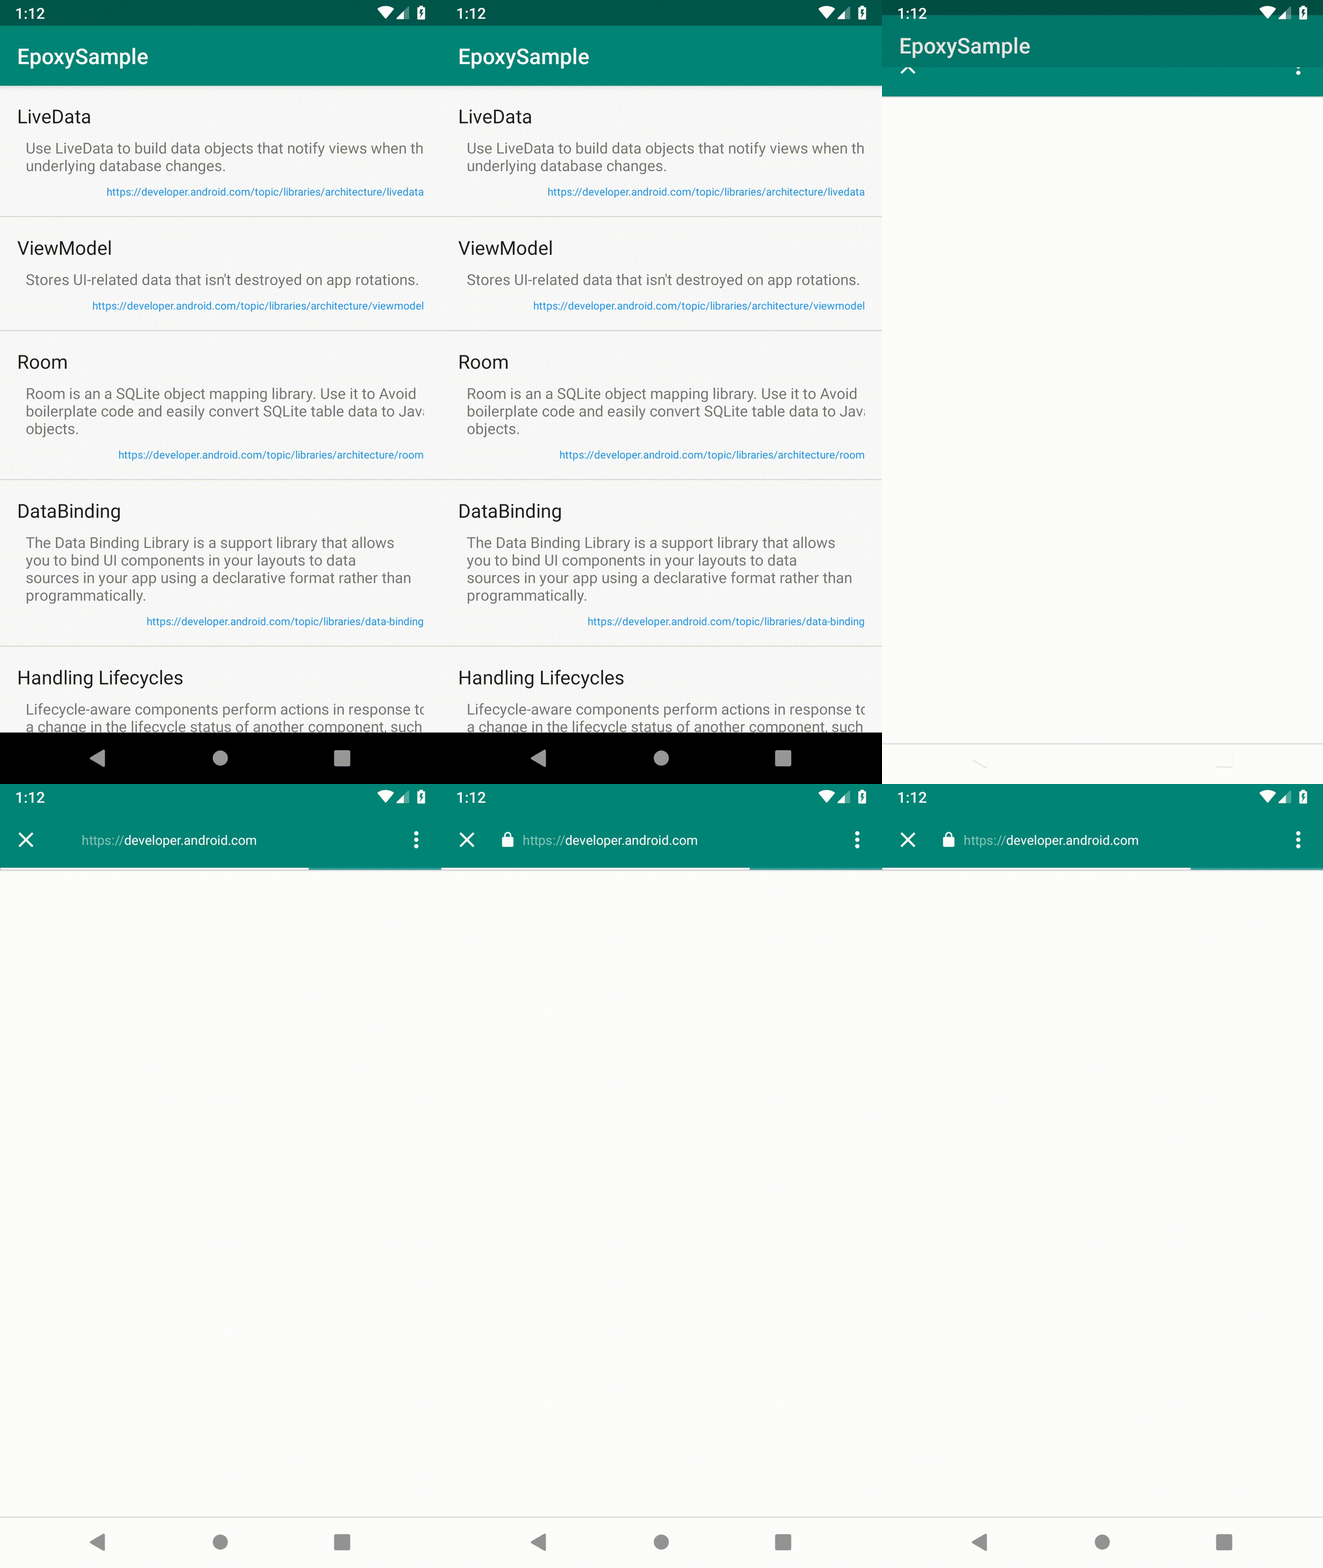
実際に以下のようなサンプルアプリを作成するつもりでEpoxyの使い方を紹介します。

ソースコード
全体のソースコードはこちらに上げております。
Epoxy
Airbnb製のRercyclerViewライブラリです。
インストール
Readmeの通りに進めれば問題ありません。
appのgradleに以下を追記します。現時点での最新バージョン3.3.1を指定します。 recyclerviewも入れておきます。
...

dependencies {
    ...
    // epoxy
    def epoxy_version = '3.3.1'
    implementation "com.airbnb.android:epoxy:$epoxy_version"
    kapt "com.airbnb.android:epoxy-processor:$epoxy_version"
    implementation "com.airbnb.android:epoxy-databinding:$epoxy_version"

    // recyclerview
    implementation 'androidx.recyclerview:recyclerview:1.0.0'
}
今回、Kotlinでの使用と合わせてDataBindingも使いたいので以下の追記もします。
apply plugin: 'kotlin-kapt'  // kotlinでAnnotation Processingを有効にする

kapt {
    correctErrorTypes = true
}

android {
    ...
    // dataBindingを有効にする
    dataBinding {
        enabled = true
    }
}
追記したら Gradle Sync しておきます。 gradleを編集するとAndroidStudio上部に「Sync Now」って出てくると思うのでそれをクリックすれば良いです。
リスト用のFragment作成
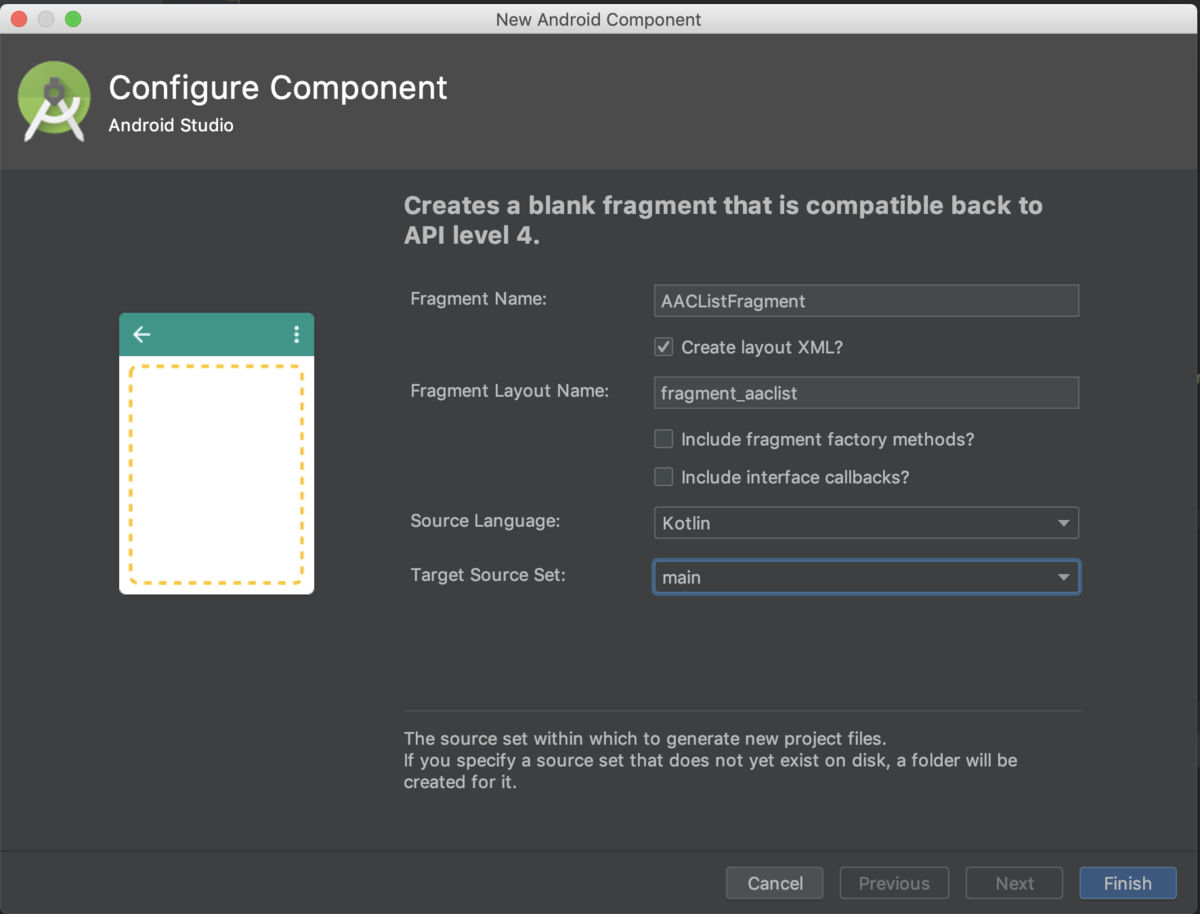
New > Fragment > Fragment (Blank) でFragmentを作ります。
設定は以下のようにします。
- Fragment Name : AACListFragment
- Create layout XML?: チェックつける
- Fragment Layout Name: fragment_aaclist
以下のチェックは外しておきましょう。
- Include fragment factory methods?
- Include intarface callback?

データ用のdata class作成
データ用のdata classを作成します。
data class AACItem(
    val name: String,
    val description: String,
    val url: String
)
data class AACList(
    val aacItems: List<AACItem>
) {
    companion object {
        // ref. https://developer.android.com/topic/libraries/architecture
        private val aacList = listOf(
            AACItem("LiveData", "Use LiveData to build data objects that notify views when the underlying database changes.", "https://developer.android.com/topic/libraries/architecture/livedata"),
            AACItem("ViewModel", "Stores UI-related data that isn't destroyed on app rotations.", "https://developer.android.com/topic/libraries/architecture/viewmodel"),
            AACItem("Room", "Room is an a SQLite object mapping library. Use it to Avoid boilerplate code and easily convert SQLite table data to Java objects.", "https://developer.android.com/topic/libraries/architecture/room"),
            AACItem("DataBinding", "The Data Binding Library is a support library that allows you to bind UI components in your layouts to data sources in your app using a declarative format rather than programmatically.", "https://developer.android.com/topic/libraries/data-binding"),
            AACItem("Handling Lifecycles", "Lifecycle-aware components perform actions in response to a change in the lifecycle status of another component, such as activities and fragments.", "https://developer.android.com/topic/libraries/architecture/lifecycle"),
            AACItem("Paging library", "The Paging Library helps you load and display small chunks of data at a time. Loading partial data on demand reduces usage of network bandwidth and system resources." , "https://developer.android.com/topic/libraries/architecture/paging"),
            AACItem("WorkManager", "The WorkManager API makes it easy to schedule deferrable, asynchronous tasks that are expected to run even if the app exits or device restarts.", "https://developer.android.com/topic/libraries/architecture/workmanager")
        )
        fun getList() = AACList(aacList)
    }
}
Values XML 編集
dimens.xml
values内にdimes.xmlを作成します。
<?xml version="1.0" encoding="utf-8"?>
<resources>
    <!-- text -->
    <dimen name="text_l">18sp</dimen>
    <dimen name="text_s">10sp</dimen>
    <!-- space -->
    <dimen name="space_m">8dp</dimen>
    <dimen name="space_l">16dp</dimen>
</resources>
colors.xml
<?xml version="1.0" encoding="utf-8"?>
<resources>
    ...
    <color name="colorAACName">#212121</color> <!-- 追加 -->
    <color name="colorAACUrl">#2196F3</color> <!-- 追加 -->
</resources>
strings.xml
<resources>
    ...
    <!-- tools text -->
    <string name="tools_item_name">LiveData</string> <!-- 追加 -->
    <string name="tools_item_description">Use LiveData to build data objects that notify views when the underlying database changes.</string>  <!-- 追加 -->
    <string name="tools_item_url">https://developer.android.com/topic/libraries/architecture/livedata</string> <!-- 追加 -->
</resources>
Layout XML 編集
それぞれ以下のように編集します。 [packege名]のところは適宜修正してください。
activity_main.xml
<?xml version="1.0" encoding="utf-8"?>
<androidx.constraintlayout.widget.ConstraintLayout
        xmlns:android="http://schemas.android.com/apk/res/android"
        xmlns:tools="http://schemas.android.com/tools"
        android:layout_width="match_parent"
        android:layout_height="match_parent"
        tools:context=".MainActivity">

    <fragment
            android:layout_width="match_parent"
            android:layout_height="match_parent" android:name="[packege名].AACListFragment"
            android:id="@+id/fragment"/>

</androidx.constraintlayout.widget.ConstraintLayout>
fragment_aaclist.xml
<?xml version="1.0" encoding="utf-8"?>
<FrameLayout xmlns:android="http://schemas.android.com/apk/res/android"
             xmlns:tools="http://schemas.android.com/tools"
             android:layout_width="match_parent"
             android:layout_height="match_parent"
             tools:context=".AACListFragment">

    <androidx.recyclerview.widget.RecyclerView
            android:id="@+id/aac_list"
            android:layout_width="match_parent"
            android:layout_height="match_parent"/>

</FrameLayout>
item_aac.xml
新規に作成します。
このXML内でDataBindingを使うので全体を <layout> で括ります。
<?xml version="1.0" encoding="utf-8"?>
<layout xmlns:android="http://schemas.android.com/apk/res/android" xmlns:app="http://schemas.android.com/apk/res-auto"
        xmlns:tools="http://schemas.android.com/tools">

    <data>

        <variable name="item"
                  type="birth.h3.app.sunaba.epoxysample.model.AACItem" />

    </data>

    <androidx.constraintlayout.widget.ConstraintLayout
            android:layout_width="match_parent"
            android:layout_height="wrap_content"
            android:layout_margin="@dimen/space_l">

        <TextView
                android:id="@+id/aac_name"
                android:text="@{item.name}"
                android:layout_width="wrap_content"
                android:layout_height="0dp"
                app:layout_constraintTop_toTopOf="parent"
                app:layout_constraintStart_toStartOf="parent"
                tools:text="@string/tools_item_name"
                android:textSize="@dimen/text_l"
                android:textColor="@color/colorAACName"/>

        <TextView
                android:id="@+id/aac_description"
                android:text="@{item.description}"
                android:layout_width="wrap_content"
                android:layout_height="wrap_content"
                app:layout_constraintTop_toBottomOf="@+id/aac_name"
                app:layout_constraintStart_toStartOf="@+id/aac_name"
                tools:text="@string/tools_item_description"
                android:layout_marginTop="@dimen/space_m"
                android:layout_marginStart="@dimen/space_m"/>

        <TextView
                android:id="@+id/aac_url"
                android:text="@{item.url}"
                android:layout_width="wrap_content"
                android:layout_height="wrap_content"
                app:layout_constraintTop_toBottomOf="@+id/aac_description"
                app:layout_constraintEnd_toEndOf="parent"
                tools:text="@string/tools_item_url"
                android:textSize="@dimen/text_s"
                android:layout_marginTop="@dimen/space_m"
                android:textColor="@color/colorAACUrl"/>

    </androidx.constraintlayout.widget.ConstraintLayout>

</layout>
EpoxyModel作成
いよいよEpoxyの具体的な使用法に入っていきます。
package-info.java
package直下に package-info.java を作成します。
[package名]のところは適宜置き換えてください。
@EpoxyDataBindingLayoutsの中にDataBindingを使用したいlayoutファイルを指定します。
ここでは先ほど作成した item_aac を指定します。
@EpoxyDataBindingLayouts({
        R.layout.item_aac
})

package [package名];

import com.airbnb.epoxy.EpoxyDataBindingLayouts;
ここで一度ビルドをしておきます。 ビルドすることでEpoxyModelが作成されます。
AACListController作成
EpoxyではRecyclerView.Adapterの代わりにControllerを作成していきます。 TypedEpoxyControllerを継承し、buildModelsをoverrideして中に処理を実装していきます。 ここでは、AACListを受け取りaacItemsの数分だけItemAacBindingModel_をリスト内に追加していきます。
class AACListController: TypedEpoxyController<AACList>() {
    override fun buildModels(data: AACList) {
        data.aacItems.forEach {
            ItemAacBindingModel_()
                .item(it)
                .id(modelCountBuiltSoFar)
                .addTo(this)
        }
    }
}
AACListFragment
AACListFragmentに処理をRecyclerViewを表示する処理を書いていきます。 onActivityCreatedをoverrideしてその中に実装していきます。
RecyclerViewのAdapterには、controler.adapterを指定します。 controler.setData()を呼ぶことでアイテムを表示してくれます。
class AACListFragment : Fragment() {

    private val controler by lazy { AACListController() }

    ...

    override fun onActivityCreated(savedInstanceState: Bundle?) {
        super.onActivityCreated(savedInstanceState)
        aac_list.let {
            it.adapter = controler.adapter
            it.layoutManager = LinearLayoutManager(this.activity, RecyclerView.VERTICAL, false)
            it.addItemDecoration(DividerItemDecoration(this.activity, DividerItemDecoration.VERTICAL))
        }

        controler.setData(getData())
    }

    private fun getData() = AACList.getList()
}
完了!
お疲れ様でした。 👏
ビルドしてサンプルアプリを実行しましょう。

おまけ
アイテムをクリックしたらリンクを開くようにする
せっかく、URLもデータとして持たせているのでアイテムをクリックしたらリンクを開くようにしてみます。
ChromeCustomTabsを使います。
androidx.browserをインストール
 // customtabs
    implementation 'androidx.browser:browser:1.0.0'
onClickListner を設定
item_aac.xml編集
<layout .../>
    <data>
         ...
         <variable name="itemClickListener"
                  type="android.view.View.OnClickListener" /> <!-- 追加 -->
    </data>
    <androidx.constraintlayout.widget.ConstraintLayout
             ...
             android:onClick="@{itemClickListener}" /> <!-- 追加 -->
</layout>
AACListControllerを編集
ClickListener を interfaceとして追加します。
class AACListController(val callback: ClickListener): TypedEpoxyController<AACList>() {

    interface ClickListener {
        fun itemClickListener(item: AACItem)
    }

    override fun buildModels(data: AACList) {
        data.aacItems.forEach {
            ItemAacBindingModel_()
                .item(it)
                .itemClickListener { _, _, _, _ ->
                    callback.itemClickListener(it)
                }
                .id(modelCountBuiltSoFar)
                .addTo(this)
        }
    }
}
AACListControllerを編集
AACListController.ClickListenerをimplementしてitemClickListenerの処理を実装していきます。
class AACListFragment : Fragment(), AACListController.ClickListener {
    private val controler by lazy { AACListController(this) }

   ...

    override fun itemClickListener(item: AACItem) =
        CustomTabsIntent.Builder()
            .setShowTitle(true)
            .setToolbarColor(ContextCompat.getColor(this.activity!!, R.color.colorPrimary))
            .build().launchUrl(this.activity, Uri.parse(item.url))
}
スクショ
